|
Just over one week ago I taught my last in-studio/in-person yoga classes at Down Under School of Yoga for the foreseeable future. Since having to close it’s physical doors my beloved studio home, spearheaded by our amazing management team, has made it possible for me & my colleagues to continue to teach yoga via live-streaming. I have to be honest, I was nervous about this change. While I am so grateful to be able to still teach, I couldn’t help but wonder if, with so many options in the online format, would people still join class? Would class still be a way to form a sense of community? After nearly a week of teaching from the entryway of my home, I have discovered what this time is teaching me (what it’s teaching all of us) is what it really means to be in a community. To be in a kula, a community of the heart. Even in our isolation, we are finding ways to connect. We are finding ways to share in what comforts, illuminates, & enlivens us.
Even though there are many things I miss about being in person with my studio & students, I am pleasantly surprised at how many things I love & want to celebrate about live-streamed classes.
Even though it looks different, I truly believe that yoga builds a community beyond having to be in the same room. This practice of yoga from wherever we are, with whatever we are going through - forges us all into a kula, a community of the heart.
1 Comment
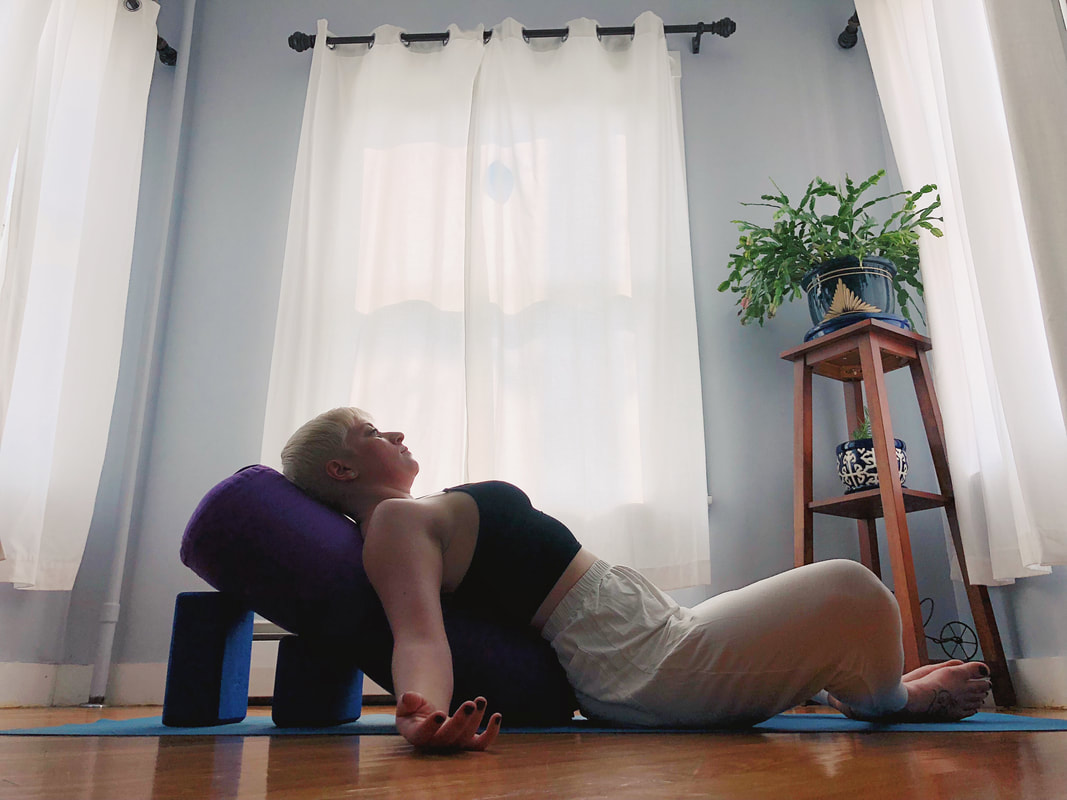
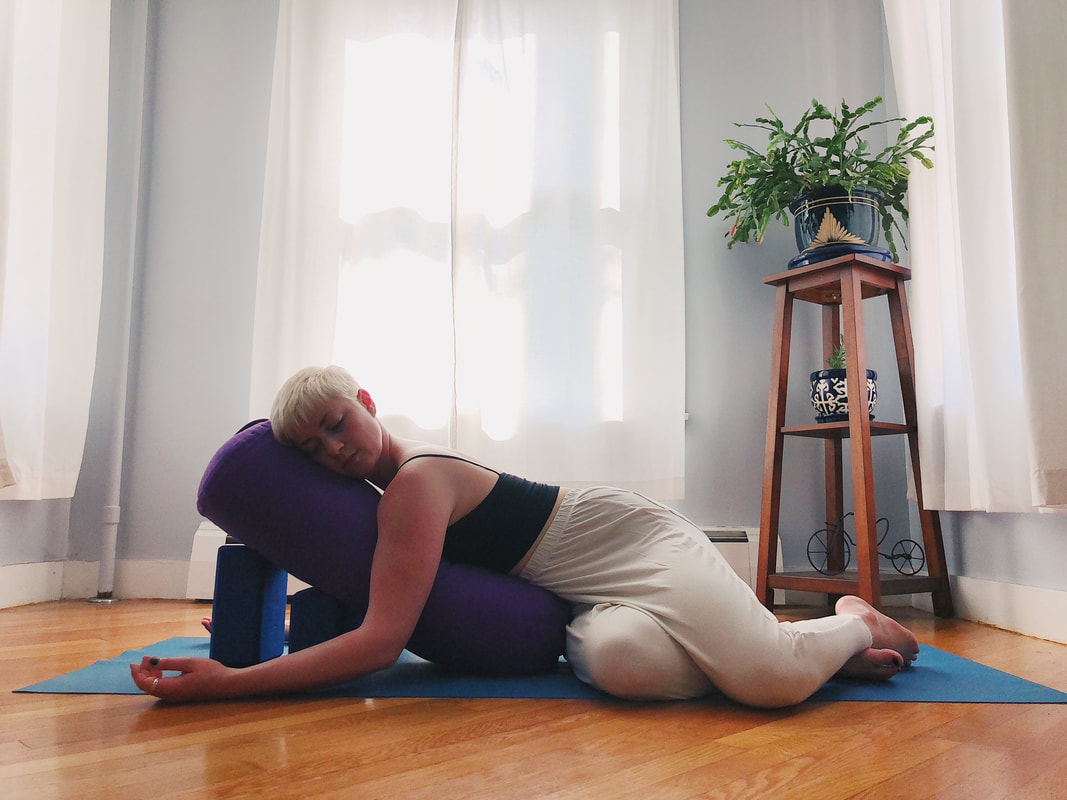
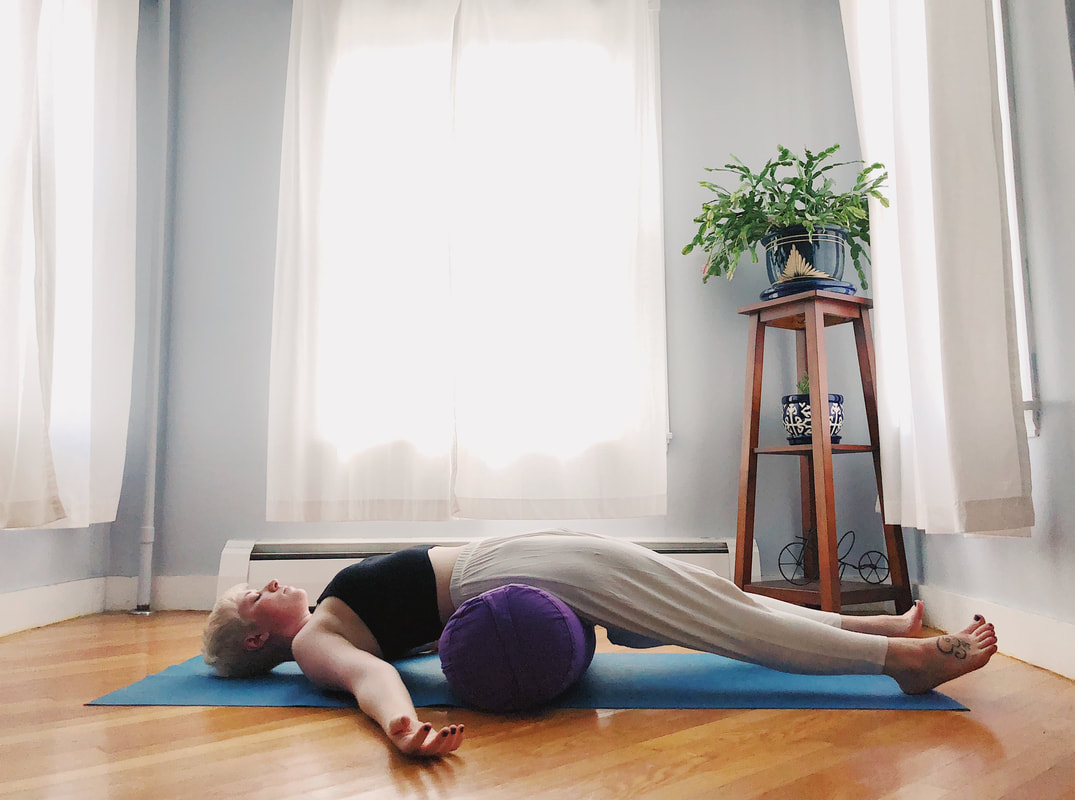
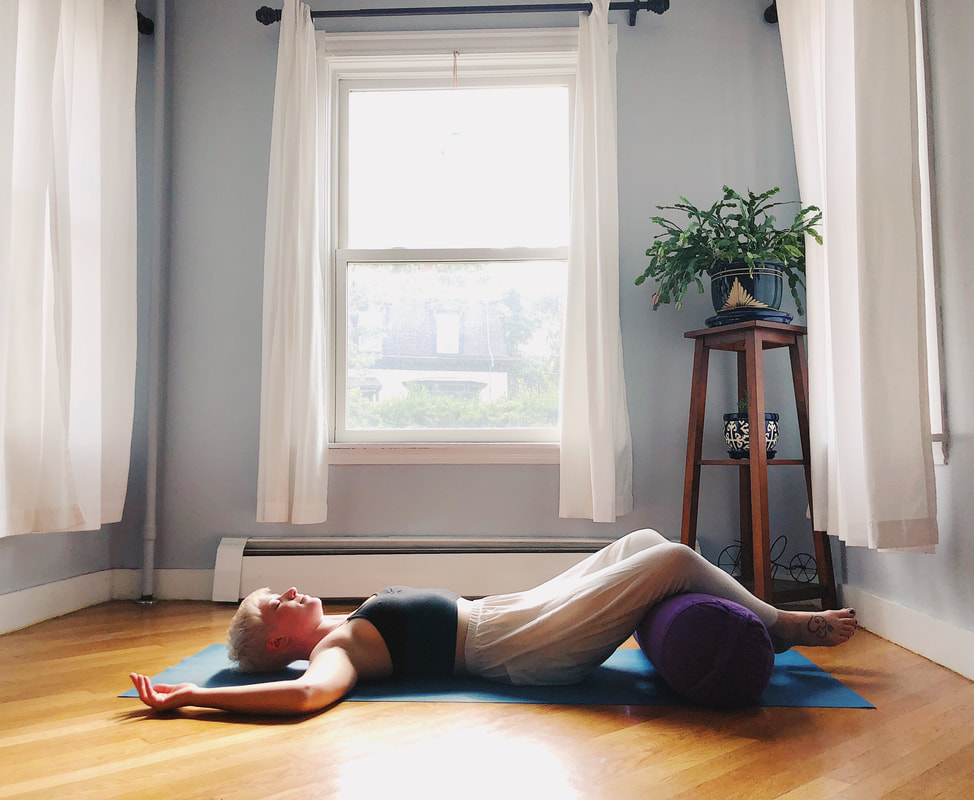
The final installment of my “Around the World” series brings us to the spine! During my 200 hour Teacher Training I had my first experience with restorative yoga and… I was not a fan. I had only practiced strong Flow up until that point and enjoyed an exhausted Savasana where I had no choice but to relax. So when presented with several poses over the course of a few hours that all felt like Savasana, I was going out of my mind. It took a few years of teaching yoga to mature enough to enjoy a restorative practice. For me it was an acquired taste, like dark chocolate - which I couldn’t appreciate when I was younger, and now it’s a much appreciated treat. Now, restorative yoga is one of the mainstays in my practice and my teaching. One of the tenets of restorative yoga is to move the spine passively in every direction, of which there are six: back-bending, forward folding, side-bending right and left and twisting right and left. Since the spine houses a crucial part of the nervous system, the spinal cord, these poses are not just useful muscularly to keep the body happy and healthy they can also help to keep your inner workings running smoothly as well. The following poses not only move the spine in every direction, but they do so passively, which allows for the muscles to relax into each shape which also gives your nervous system a boost by stimulating the relaxation response, which can help bolster your immune system, digestion, sleep patterns and overall sense of well-being. Quick note: While not pictured, a blanket (or several) can make a world of difference in many of these poses. I've listed some ways to use blankets below, but when in doubt, if something doesn't feel quite right - add a blanket! Enjoy! Supported Reclining Pose: Set up with two blocks in a stair step orientation (one higher than the next) and angle a bolster vertically from the floor over the blocks. Sit on the floor just in front of the bottom edge of the bolster and lay back allowing for as much of the spine to be supported as possible. Legs can be bent or straight, whatever is most comfortable. When in doubt, aim for symmetry over asymmetry (pictured here with feet together, knees wide in Baddha Konasana Bound Angle Pose). Let arms relax off to the side and stay for 5-10 minutes. Tips and Modifications:
Bolster Twist: Set up with two blocks in a stair step orientation (one higher than the next) and angle a bolster from the floor over the blocks. Sit on the floor just in front of the bottom edge of the bolster and drop both knees over to the right, turn the torso to face the bolster and lay the front body down onto the bolster. Allow the arms to relax to the floor on either side of the bolster. Stay 2-5 minutes, repeat on other side. Tips and Modifications:
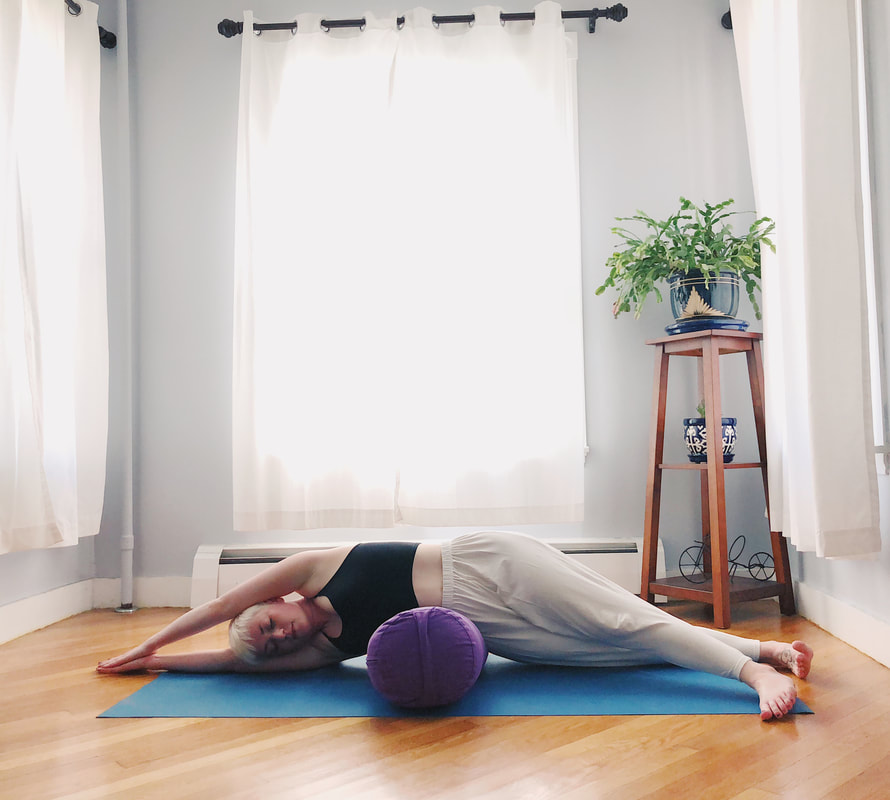
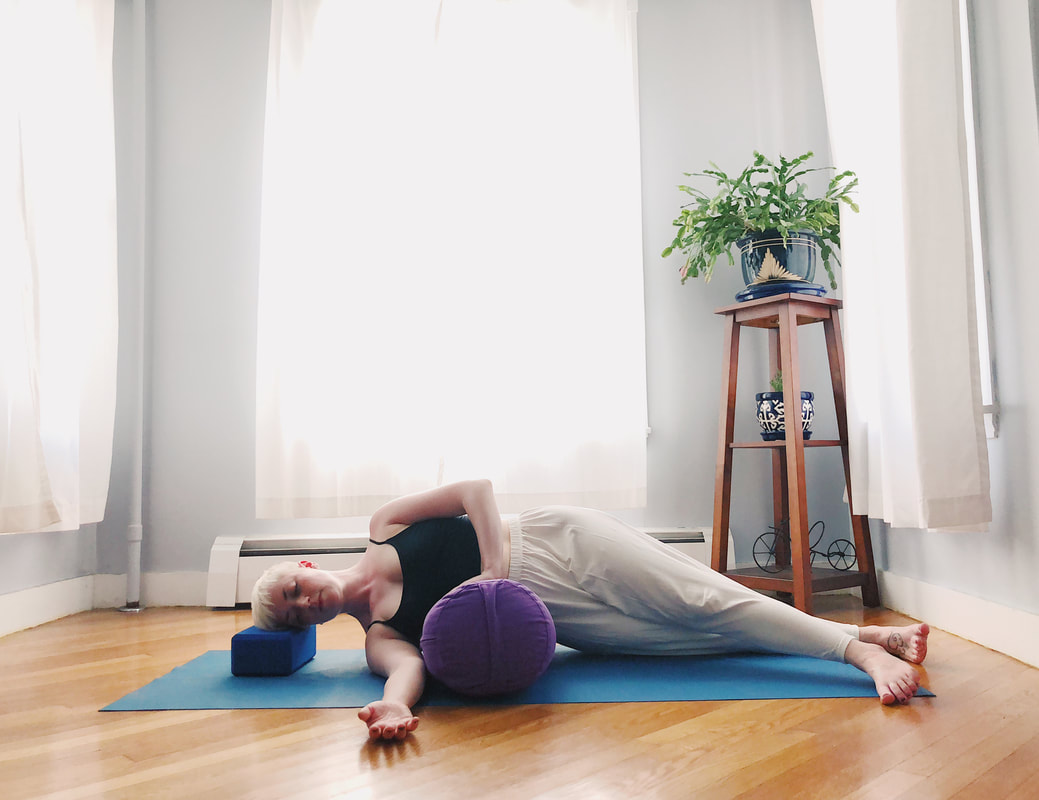
Side-Body Stretch: Place bolster down horizontally and lay down with the bottom most rib on the side waist in the middle of the bolster. Bottom arm can stretch out under the head as a support (as shown in first photo) or stretch out in front of the torso with head resting on block or blanket (as shown in second photo). Top arm can stretch overhead (as shown in first photo) or bend and rest in front of the torso (as shown in second photo). Legs can be straight and staggered (as shown in both photos) or bent. Stay for 2-5 minutes and switch to the other side. Tips and Modifications:
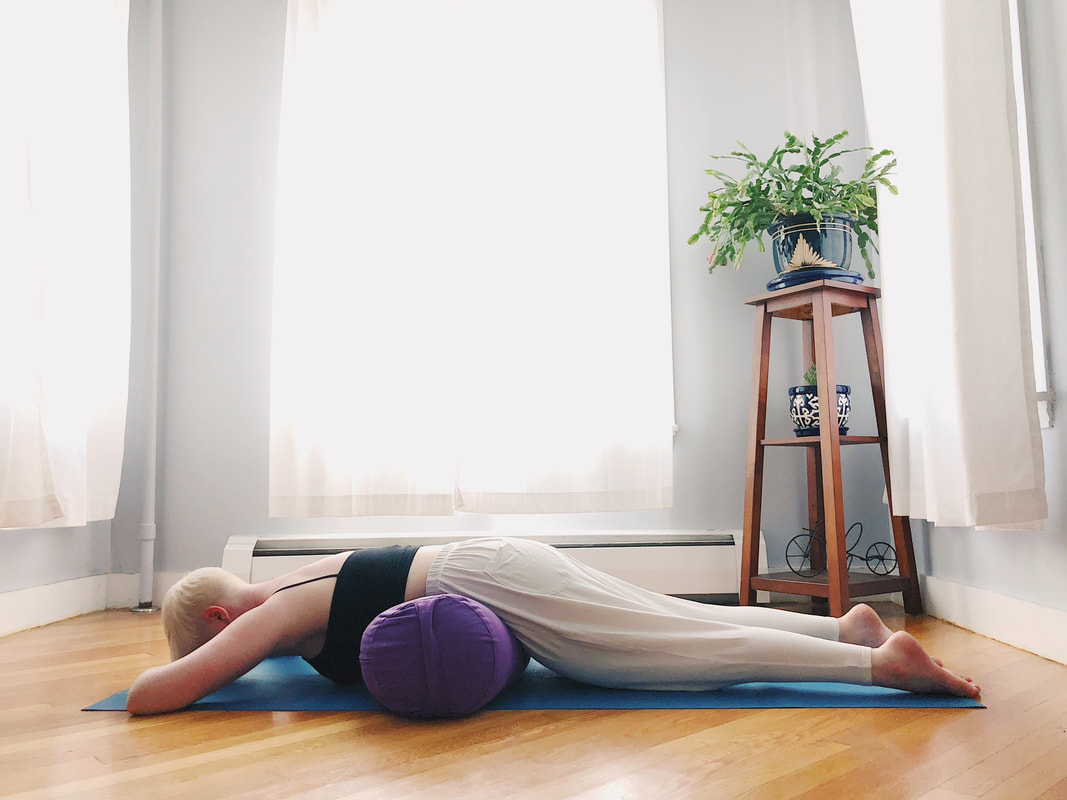
Belly Bolster: Lay bolster down horizontally and place belly button down on top of bolster. Head can be supported by stacked hands (as shown in photo), supported by block or blanket or turned onto one cheek (aim to switch to other side of the face about halfway through the hold to even out the sides of the neck). Legs stretch out and relax. Stay 2-5 minutes. Tips and Modifications:
Supported Bridge: Lay the bolster down horizontally and sit on the front edge of the bolster with knees bent and feet on the floor. Slowly "crab-walk" the hands to the floor behind the bolster gently guiding the elbows, shoulders and head to the floor behind the bolster. Press down into the feet to lift the hips and adjust the bolster underneath the sacrum (a flat-ish triangular shaped set of fused vertebrae at the base of the spine, just above the tailbone.) Knees can stay bent or straighten out along the floor. Stay 2-5 minutes. Tips and Modifications:
Savasana: Laying on the floor place bolster horizontally beneath the knees. Let the body get heavy and be supported by the floor, and rest. Stay for 5-20 minutes. Tips and Modifications:
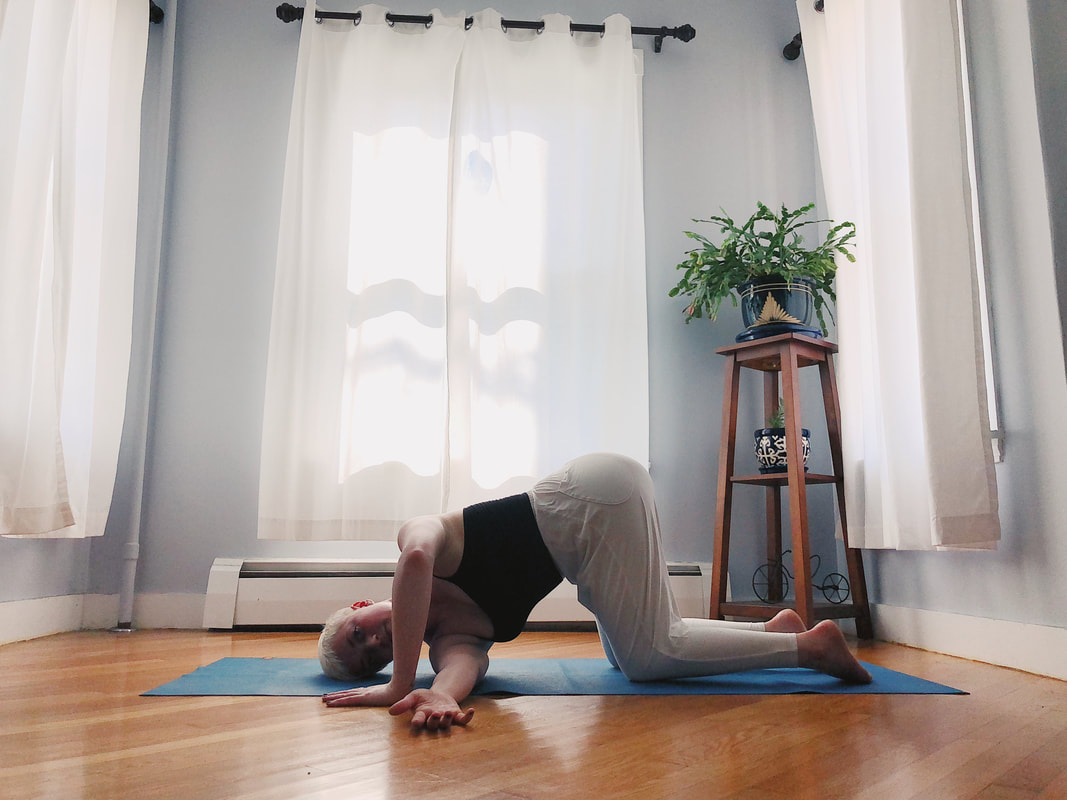
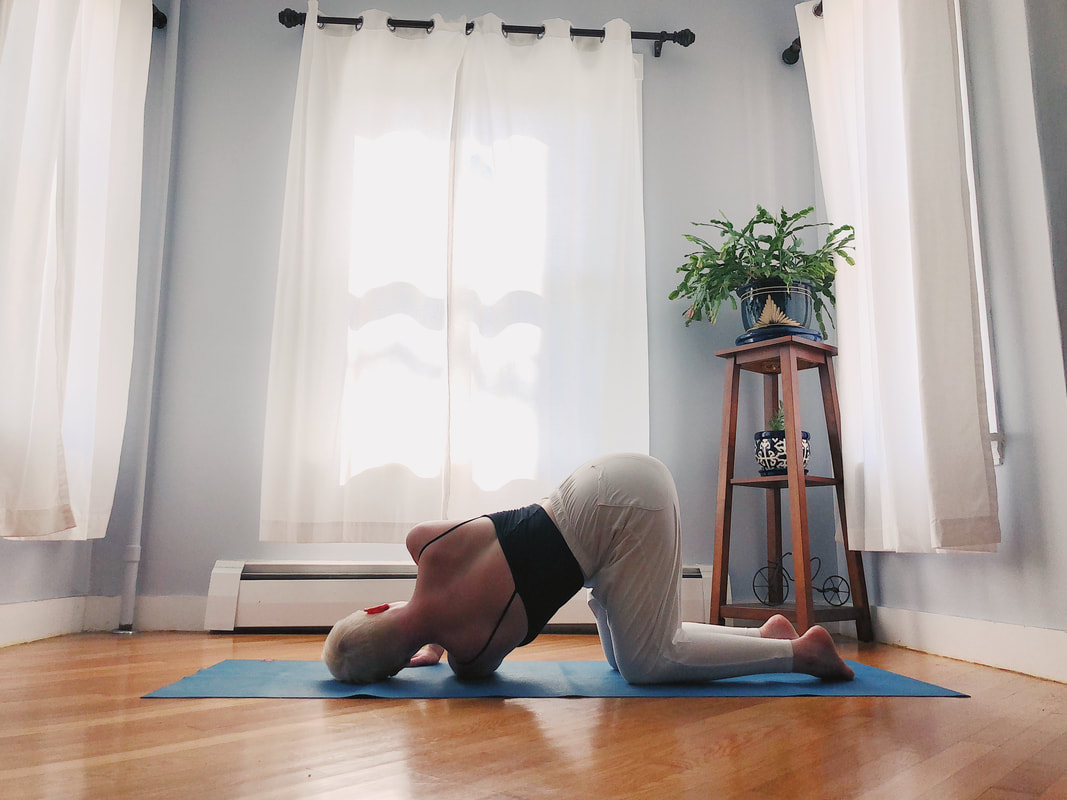
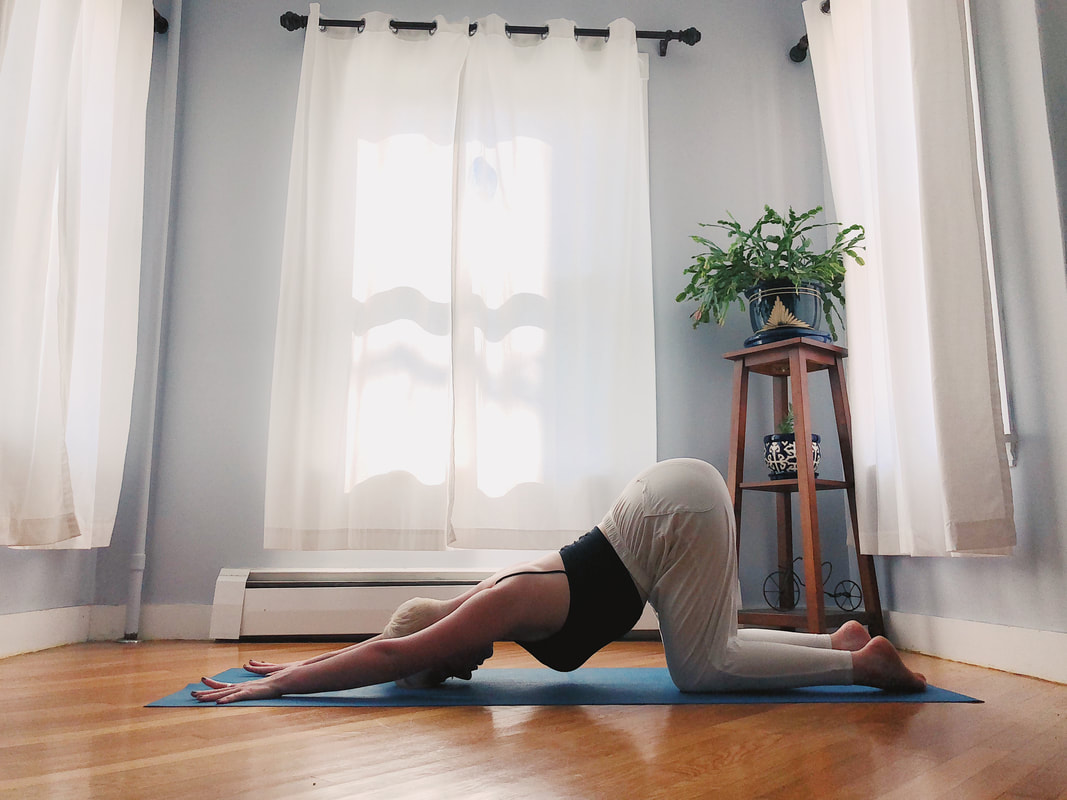
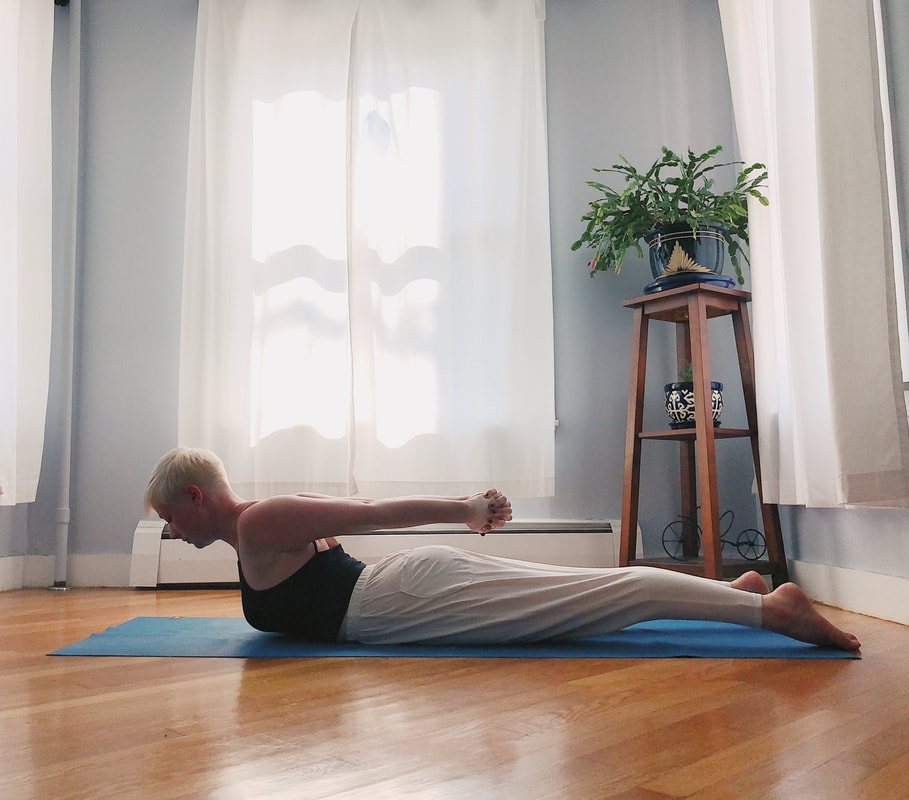
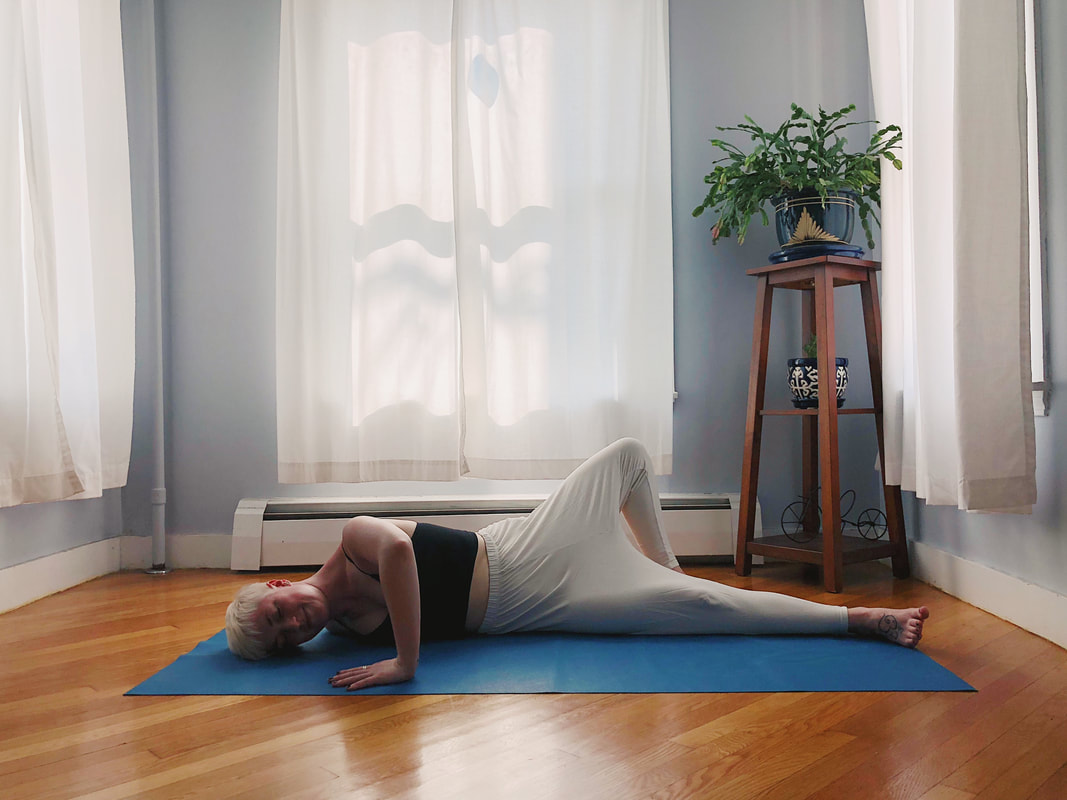
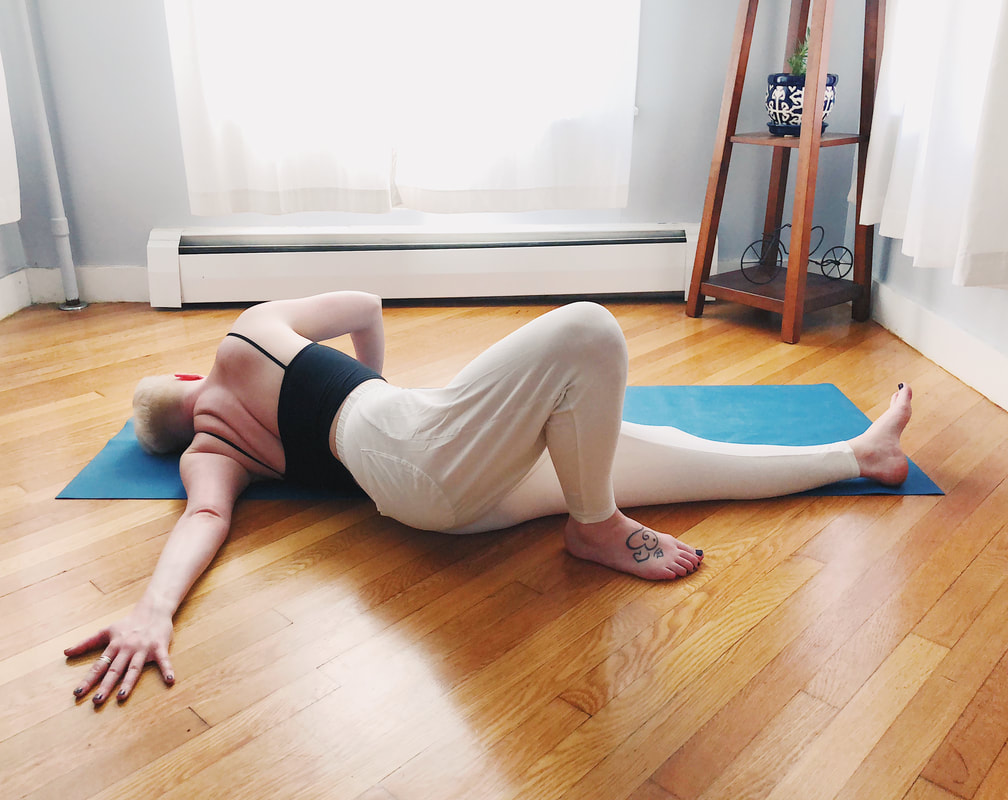
-xxx- While the shoulder is the most mobile joint in the body, the realities of everyday life can cause the surrounding muscles to become stiff and painful. Whether it’s due to the hunch over your computer, phone, steering wheel, or garden - most of the everyday shoulder movement is minimal and can create patterns of tightness where we want to be open (like in the chest) and weakness where we want to be strong (like between the shoulder blades). To bring back happy and healthy shoulders, and following along with my “Around the World” series, here is my mini sequence for “around the world for the shoulders.” Enjoy! Cow/Cat: Starting on all fours, place the hands beneath the shoulders and the knees beneath the hips. Spread the fingers and root down into every knuckle and fingertip. Cow: On an inhale pull the chest forward and up, allow the belly to drop as the crown of the head and tail lightly tilt up. Cat: On an exhale push down into the earth and round the spine towards the sky, crown of the head and tail drop towards the earth. Repeat on the breath. Work to keep the hips over the knees and the shoulders over the wrists. On the inhaled cow position the shoulder blades squeeze in and up towards the front body (retraction) and on the exhaled cat position the shoulder blades spread away from the spine opening the back chest (protraction). These movements can help to create space along the chest, between the shoulder blades, and down the whole length of the front and back torso. Repeat for 30 seconds to 2 minutes. All Fours Backstroke: Starting on all fours place the hands beneath the shoulders and the knees beneath the hips. Spread the fingers and root down into every knuckle and fingertip. Reach the right arm out and up towards the sky - keeping both arms straight begin to backstroke the right arm towards the back of the mat, across the floor, forward and back up - drawing a large circle. Work to move through this slowly enough to notice where there might be tightness and try to pause for an extra beat in those spots.This movement brings the shoulder blade up and down the back, when the lifted arm is reaching towards the front of the room the shoulder blade lifts and "wings" off the upper back in upward rotation and as the top arm circles around and back the shoulder blade moves into the midline and down towards downward rotation. This movement also can create space along the sides of the neck, the front of the chest, the top of the shoulder, and between the shoulder blades. Repeat several times and then switch sides. All Fours Twist: Starting on all fours place the hands beneath the shoulders and the knees beneath the hips. Spread the fingers and root down into every knuckle and fingertip. Reach the right arm out and up towards the sky and on an exhale thread the right arm across the floor underneath the left armpit. Try to get as much of the right arm, from the shoulder to the fingertips, on the floor the right side of the head comes to the floor (or a blanket) and keep the hips more or less over the knees. Left hand can adjust to push the floor away. This pose, like cat pose - protracts the bottom arm's shoulder blade, creating space in the upper back. The top arm pushing the floor away helps facilitate chest opening (and deepens the protraction of the bottom arm's shoulder blade) as well as increases the spinal twist. Twisting is also one of the most potent ways to stretch the muscles along the length of the spine. Hold for 1-2 minutes then unravel to switch sides. Anahatasana (Heart Melting Pose): Starting on all fours place the hands beneath the shoulders and the knees beneath the hips. Keep the arms straight and hands pushing the floor away, begin to walk the hands forward while the hips stay stacked over the knees. Allow the head and chest to drape towards the floor while resisting the arms away from the floor by pressing strongly down into the hands. This shape brings the shoulder blades back into upward rotation and with gravity assisting can create space through the triceps, deltiods, the outer border of the shoulder blades up into the waist (into the serratus anterior and the lattisimus dorsi). And as the poses name suggests, this can also be a potent chest/heart opener. Hold for 30 seconds - 2 minutes. Low Cobra with "C" arms: * this is what I regularly tell my students is a "desert island backbend" ...if you could only bring one backbend with you to a desert island, there are many compelling reasons for this (or a variant of this) to be that pose. It is the anti-sitting/anti-slouching pose. It opens all the areas usually left quite tight from day-to-day movement, like the front of the chest and strengthens the upper back muscles with minimal risk to the lower back. When this pose is practiced consistently, it can help with sitting and standing up tall with more ease. Work your way up to doing this pose for 1 minute every day! Start lying belly down on the ground. Point the toes, and firm the outer ankles in to bring the feet parallel to one another and no wider than the hips. Press every toenail into the earth, even the pinkie toe. Bring the hands to clasp behind the back, interlacing up to the webbing, and on an inhale pull the hands back and up to lift the chest forward and up. If the hands do not clasp, use a strap or towel between them. Stay for 30 seconds to 1 min then switch interlaces (other thumb etc on top) and repeat. Prone Chest Opener: Start lying belly down on the ground. Stretch the right arm to the right at about 90 degrees to the body palm down. Gradually, use the left arm push the left side of the body to roll over onto the right side of the body (the right arm will now be directly behind the body still at 90 degrees.) Let the head relax to the floor, and if it doesn't, use a blanket for support. Legs could bend towards the chest, like a fetal position to help hold the torso in this position, or the bottom leg could stay straight while the top leg steps to the floor behind the bottom leg, knee bent (as pictured). No need to roll all of the way over. This shape can be a quite potent chest opener even just in it’s starting position so proceed slowly, be sure the breath is moving freely and give your body time to give feedback on the shape before moving deeper. Give these poses a go and let me know how your shoulders feel! -xxx-
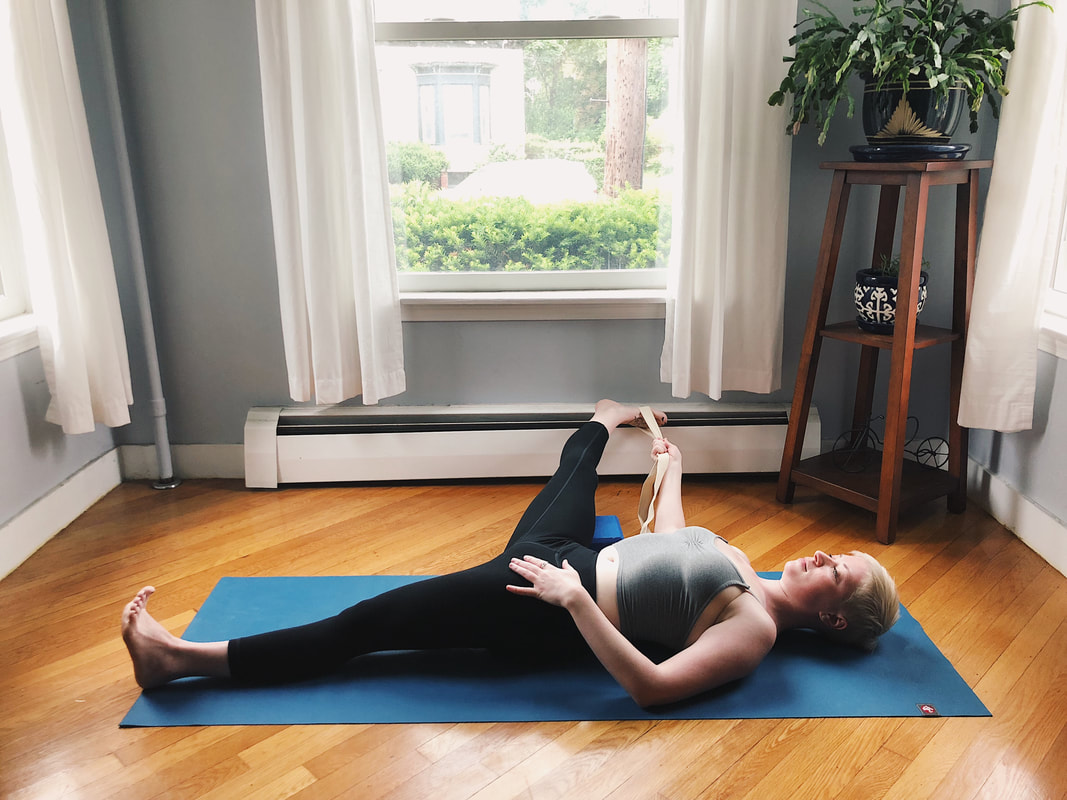
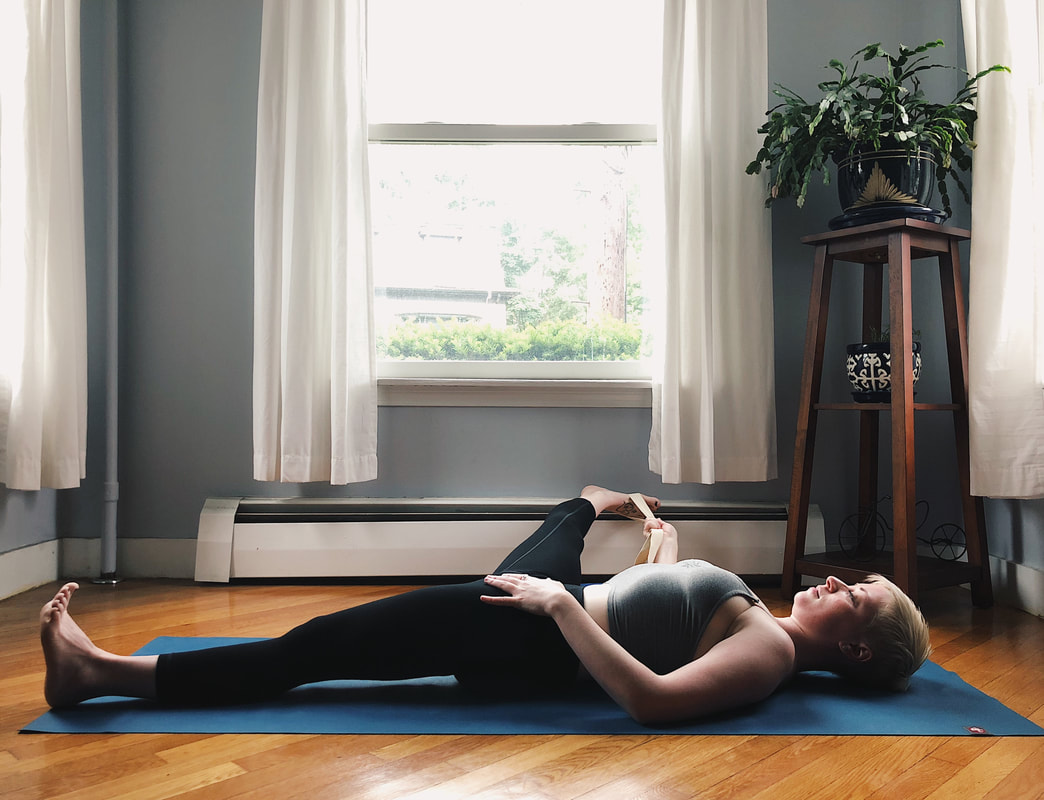
One of the most common requests I get teaching yoga asana is to help my students create more mobility in the hips. Among other things, tightness in the hips and legs can contribute to difficulty moving and low back pain. Here’s a sequence for the hips I call “around the world” (a call-back to a basketball game I used to play with my big brother as a child). This mini-sequence gets into all four sides of the hip. It's a perfect sequence for beginners and advanced practitioners alike to bring more awareness to the lower body and start to alleviate lower body tightness, while being fairly accessible as all of the poses are supine (on the back). Enjoy your journey "around the world" with your hips! Supta Padangustasana 1 (Supine Hand to Big Toe Pose 1): 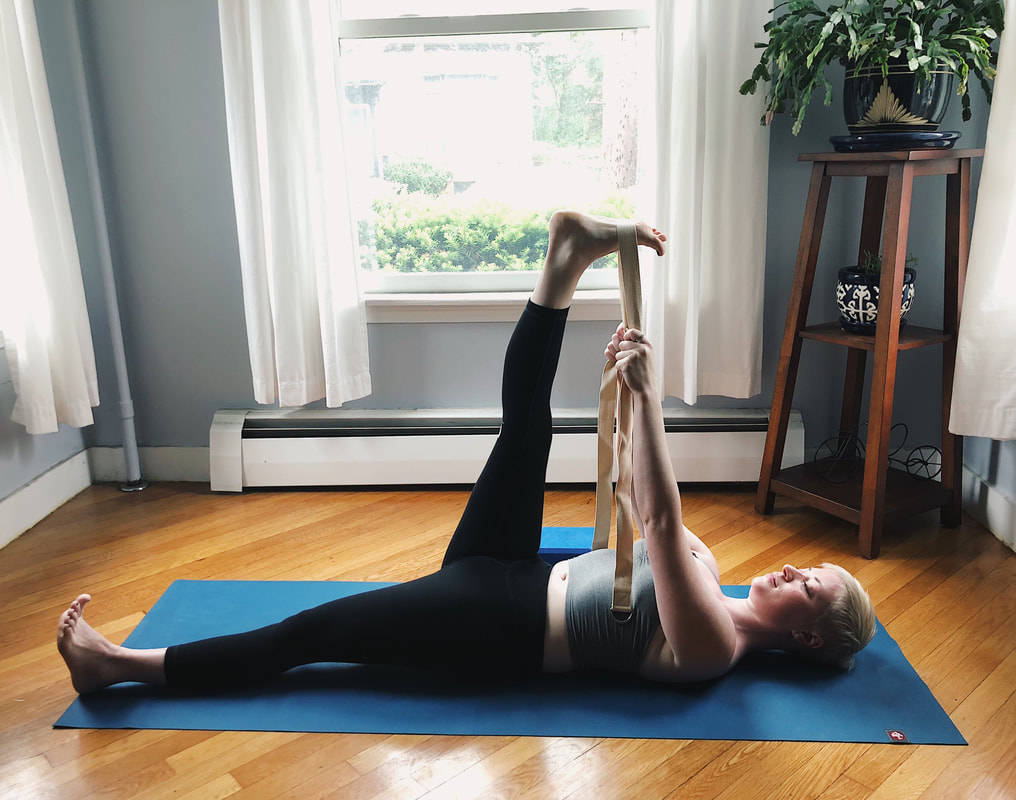 Photo by Omar Robinson Photo by Omar Robinson * This is one of my most used poses. I almost always begin every private session I teach have with this pose. It allows for the opening of the back of the thigh/hamstring muscles while keeping the lower back in a safe position on the floor. Have a strap nearby and lay on the floor in a supine tadasana - feet about hips width apart, knees and toes actively turning to the ceiling. Draw the right knee towards the chest and loop the middle of the strap along the ball of the foot (the area just above the arch but below the toes) and straighten the right leg towards the ceiling. Keeping the shoulders and head on the floor, reach up and hold the strap one side in each hand. Pull back equally with each hand so both the pinkie and big toe sides of the foot are level to each other. Keep the right leg straight, without hyper-extending/locking the knee, even if that means the leg doesn’t get very close to the torso! Use the weight of the arms and begin to gradually pull the right leg back towards the torso. Push the left leg into the floor keeping the left knee and toes still pointing straight up towards the ceiling. Stay for 1-2 minutes. Other ways to do this pose:
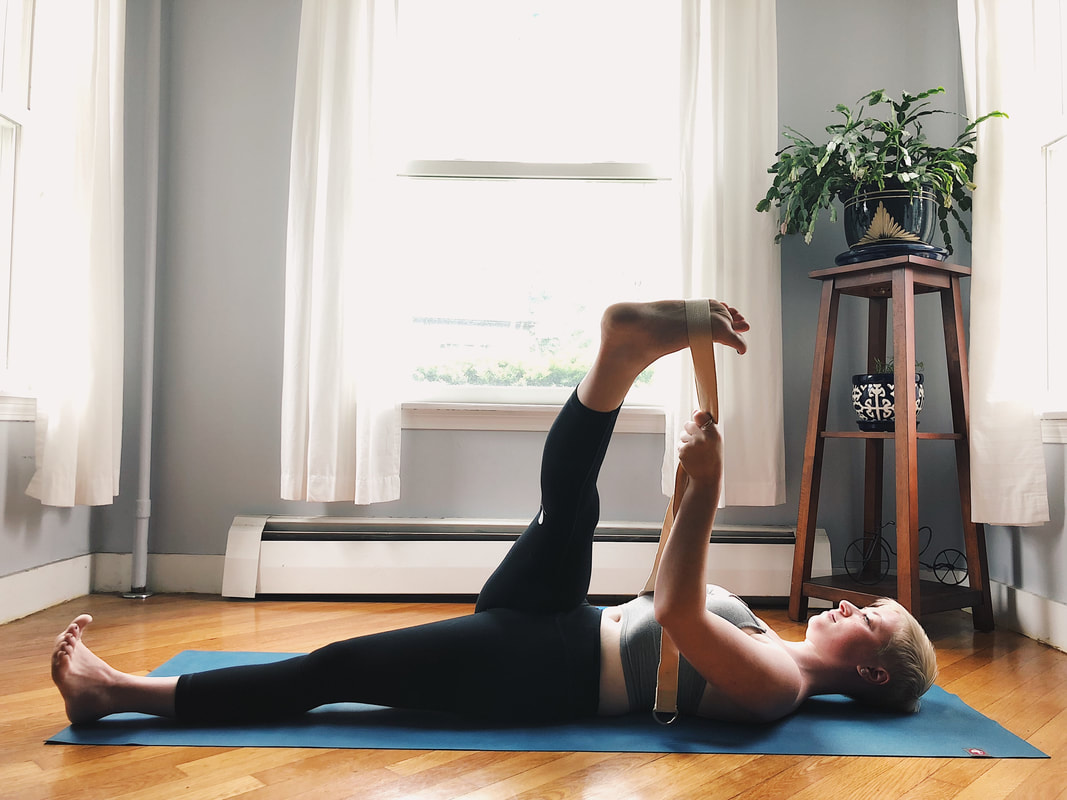 Photo by Omar Robinson Photo by Omar Robinson Supta Padangustasana 3 (Supine Hand to Big Toe Pose 3): * I know, I know - why go from Supta 1 to Supta 3, and not chronologically to 2? In this variation of Supta 3, it’s actually a closer segue! This pose moves the opening to the outer hamstring, IT band and glute muscles. Coming from Suptapadangustasana 1, pass both ends of the strap into the left hand and direct the right leg about 10 inches to the left. If you pictured your right leg on a clock-face, it’s going from your 12 O’Clock to your 10 O’Clock. It should be just enough of an angle that the right hip feels light on the floor, but not so light that it has lifted off of the floor and begun to twist over the left hip. Pull back on the pinkie toe side of the foot a bit more vigorously, as it will want to sickle away from the torso more than the big toe will. While keeping the right leg straight, direct the right hip towards the left heel and gradually encourage the right foot towards the left armpit. Stay 1-2 minutes. Other ways to do this pose:
Supta Padangustasana 2 (Supine Hand to Big Toe Pose 2): * This shape moves the opening into the inner thigh/adductors and is potentially the most gravitationally difficult pose of the bunch, as such it's pictured with and without block support for aerial leg. Coming from Suptapadangustasana 3, draw the right leg back towards the midline, then pass both ends of the strap into the right hand. Press the left hand down onto the left hip to keep it stable, and use the right hand to guide the right leg up and over to the right into a straddle. Work to keep the right leg straight, direct the right outer hip towards the left legs heel and press the left thigh/hip down to keep the two halves of the hips parallel to the ceiling. Stay for 1-2 minutes. Other ways to do this pose:
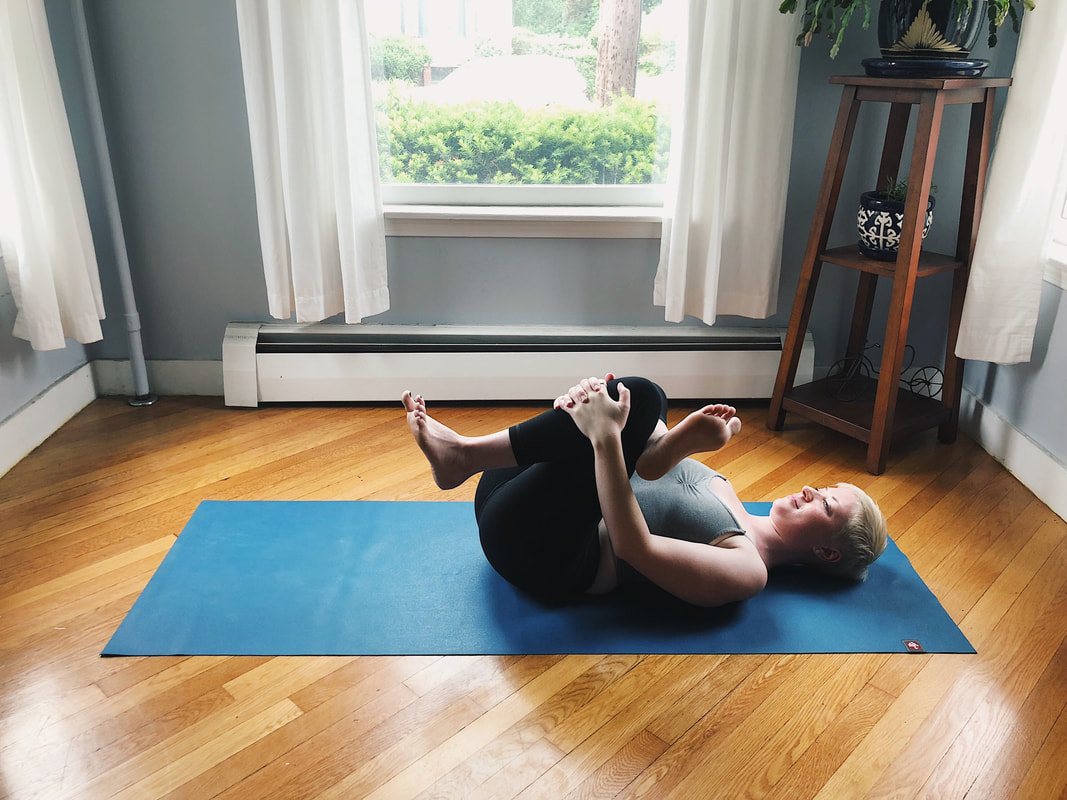 Photo by Omar Robinson Photo by Omar Robinson Figure 4: * This shape brings the opening back towards the outer hips, but usually a bit deeper into the back of the glutes/external rotators than Suptapadangustasana 3. This version is particularly useful for those with knee issues or low back injury/disfunction. From Suptapadangustasana 2, Draw right leg into midline and bend the left knee, stepping the left foot to the floor. Cross right ankle (just above the foot) over the left thigh. Right hand and arm thread in between the two thighs, left hand wraps around the left thigh and hands clasp behind left thigh or left shin. Use the clasped hands to pull the left leg closer to the left shoulder and resist the right knee away from the right shoulder. Stay 1-2 minutes. Other ways to do this pose:
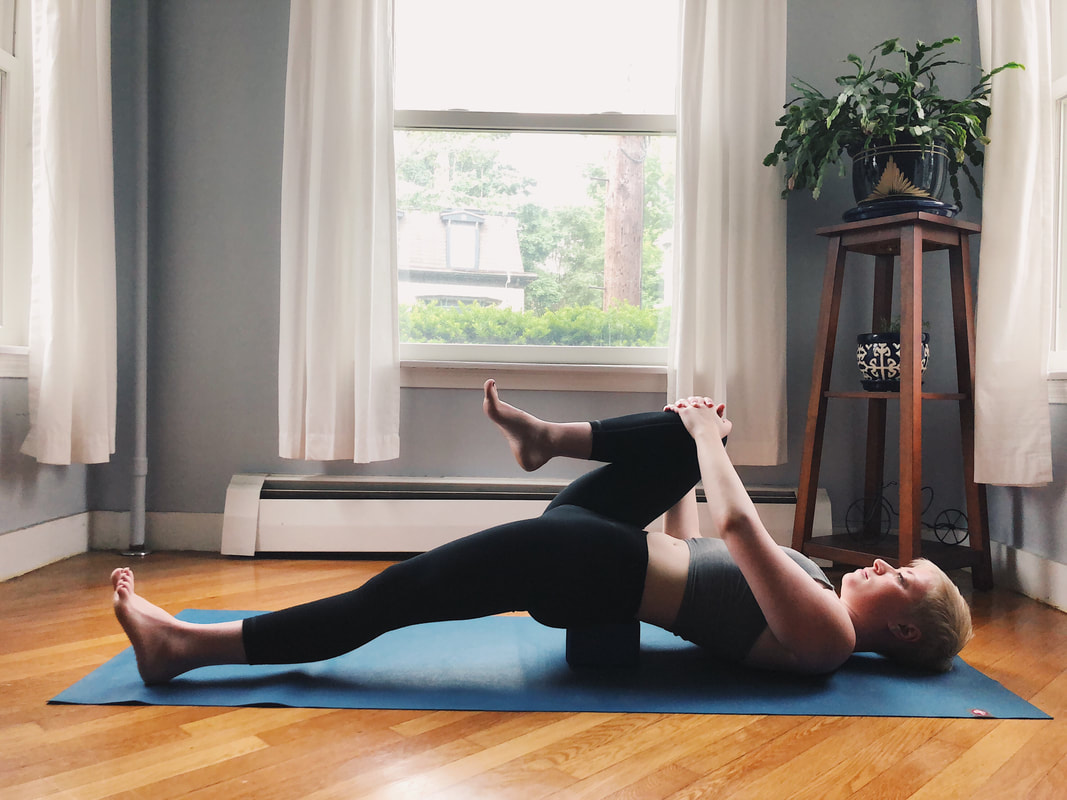 Photo by Omar Robinson Photo by Omar Robinson Supported Bridge: * My students have heard me say this a thousand times: This is the MVP “most valuable pose” these days in my book. With the amount of sitting inherent in daily life, plus all of the propulsion we do (walking, running, cycling) the fronts of the hips are usually severely tight and there are very few passive positions that allow for lengthening these tight areas. Supported bridge is just the ticket! This is probably the pose that I use and give as homework the most right now. With a block nearby, set up laying on the floor, both knees bent. Feet and knees about as wide as the hips. Push into the feet to lift the hips and slide the block under the sacrum (a flat-ish triangular shaped set of fused vertebrae at the base of the spine, just above the tailbone.) Both knees can stay bent, or one leg can straighten and drop down towards the floor. To deepen perhaps the other leg bends and pulls back towards the torso. It is possible to straighten both legs in this pose, but be very mindful of the low back as it can get compressed in this position. Stay 1-2 minutes each side. Other ways to do this pose:
Repeat all poses on the left side and let me know how your journey around the world with your hips went! Three years ago today I got a call saying my father was dying. He was half a world away in Jakarta, and dying. I almost didn’t answer the phone… my father never called me from Jakarta, only messaged. But I did, I answered the phone. And my father was dying. My mind raced as I tried to make sense of the information coming my way - there is nothing more they could do. “There’s no time for you to come here. He might be able to hear you… say your goodbye. We’ll let you know when he’s gone”.
This all happened in the entryway of the high-end gym where I taught yoga. People walking by to get their smoothies recoiled from my tears. This was sudden, I had phone calls to make. I had to get subs for my evening classes. I had to inform my partner. I had to inform my family. Fifteen minutes later I was on the T on my way home and got a text saying he had passed, “I’m sorry for your loss.” My jacket was zipped all the way to the top, scarf wrapped around my quivering face, sunglasses on to spare those around me the tears spilling down my face. My partner, somehow managed to find me on the T (he has a knack for such things). He sat next to me and scooped me into his arms as I weeped. The next several days were a blur of grief, anger, and confusion. My father was a half a world away, there was nothing I could do. I make a living teaching yoga. If I don’t teach, I don’t get paid. My father died on a Wednesday (US time, early Thursday in Jakarta), I was back teaching yoga on Saturday. While the studio owner, managers, and many teachers knew about my loss, I chose not to say anything about losing my father to my students. I am their teacher. It’s not their job to take care of me. Honestly, teaching helped. Listening to and watching my students move and breathe allowed me to be the version of myself who hadn’t just lost her father. While I was teaching I got to be the version of myself who is an adept and skillful teacher, someone who is in service of those in front of her. That is until their resting pose, Savasana. The moment I settled my class into Savasana, to be with themselves, I was forced to be with myself. To recognize and sit with my still raw, broken and wounded self. Tears freely streamed down my face. The following week I returned back to my teacher’s class to practice. When I was focused on aligning my bones and using my muscles in an effective and efficient manner, I felt adept and skillful. I felt relief from my circumstances. I was feeling my body move and breathe, I was in the present moment. I was no longer the version of myself deep in grief. Then Savasana. The moment I settled into stillness and closed my eyes, my chest began to hurt, and tears freely streamed down my face. The purpose of a yoga asana practice is to create a vessel that is strong and supple. A vessel that can be resilient and functional in everyday life. A vessel that eventually can be still with itself in whatever state it is in, and abide in that stillness. What I learned three years ago was that while my teaching and yoga practice gave me space and respite from my grief, it also gave me the strength to then move through my grief. To be resilient and to abide in my given circumstances. xxx To learn more about my father, Michael N. Heffernan - listen to a piece WBUR's Remembrance Project did on him the Spring after he died, here. When I was a freshman, or maybe a sophomore in High School, I remember being in one of my Language Arts classes with my favorite teacher, Norm Vandal. Norm was the type of teacher that lulled students into a sense of security by entertaining the class. He recounted crazy stories, like the one about the time he got stuck on his tin roof butt-naked in the middle of summer and had to figure out how to safely slide his way down before his neighbor drove by. His storytelling was so vivid and full of tension, the entire class would be in hysterics. Just when we thought we were getting away with murder by listening to a funny story during class time, he would masterfully weave his story back into a lesson. Like a chef sneaking vegetables into mac & cheese, he was teaching us without us realizing he was teaching us. He was truly masterful.
On the day in question, I cannot remember what book we were talking about, but I do remember the look in Norm’s eye when he asked for a volunteer. His eyes caught mine—he smirked knowingly. This wasn’t the first time this had happened (nor would it be the last) if I didn’t raise my hand, he would “volunteer” me anyway. So, I played along. He asked me to stand. I did. Then with a flick of his hand he said “Go.” I puzzled… “…go?” “Go.” He repeated. “…” I blushed - “But… where?” “HA! There you see?!” He bellowed gleefully. “Why didn’t you just go? Why do we need the answer—why can’t we learn to love the questions?” At some point during his lecture that followed, I curled my way back into my seat. Despite my momentary embarrassment, for not getting it *right,* what Norm said that day stuck with me. “Learn to love the questions,” he said. “They are so much more interesting than the answers! Like balancing on one leg - questions are alive and full of possibility… answers are stagnant, finite, even boring.” But… I liked having the answers. Up until that day, having the answers worked pretty darn well for me, I was a good student, I made good grades, I relished in having an answer and in getting that answer *right* - what was so wrong with having the answers anyway, what’s so bad about being boring? But like many a good lesson, “learning to love the questions” kept coming back. As I grew and eventually became a yoga teacher, I found myself gravitating back to that linear way of thinking: there is a *right* way to practice and a *right* way to teach, and I wanted, even needed, to be *right.* To be the best. Now, several years and thousands of hours of teaching later, I realize that Norm was right all along. Answers, while comforting, are not only boring but inadequate. Yoga is the practice of being in the present moment, and the only truth about the present moment is that it is always changing. So we as yoga teachers and as yoga practitioners need to be willing to inquire within to keep up with that ever-changing state of being. Instead of being caught up in what is right and what is wrong, can we learn to love the questions, to embrace the questions:
xxx * This blog post was originally written for Down Under School of Yoga as part of their Voices: Path of a Teacher Series. Earlier this week I posted a quote from renowned yoga teacher Donna Farhi - “an authentic yoga practice is anything that nourishes an individual so that they can truly befriend themselves.” And I have to be honest, my yoga practice does nourish me - it makes me feel whole and full but I am afraid to admit that I am still not quite there on befriending my body.
So, real talk time: As a yoga teacher, I tend to be pretty tight lipped about my private life. This blog has been mostly focused on asana, technique and philosophy. But lately, I’ve been doing a lot of self inquiry, and as I am always on a quest to be more fully me in my teaching… I think it might be time to open up a bit and allow for some public vulnerability. I don’t want to fight with myself anymore. I don’t want to shame my body anymore. Ever since I hit puberty, I have spent so much time and energy quietly worrying about my body, its size, the size I wish it was, and the things I should be doing to make my body be the way I want it to be. All the while I claim to be “body positive.” I don’t talk about getting a “bikini body” in my yoga classes, I cheer on friends and strangers alike who are outwardly accepting of their bodies, even enjoying their bodies just as they are. I like their photos, share their articles and say to myself, “How wonderful! That’s so awesome for them!” I have had many a conversation with students who come to me with their own hangups about their physical body, and I with compassion, explain that it’s not about the shape or size of the body but what it is capable of, what makes you feel alive and full and happy that matters. I was a fraud. I was talking the talk, but not walking the walk. I was faking it, til I made it. While I believed all of these things, I only believed in all of these things for other people… I could never be like that. I could never be happy with the way I look until my waist got down to a certain number or my weight dropped back to my lowest adult weight (which by the way I only got there twice, once after my first major breakup and I couldn’t eat without crying and the second time was when I was going to the gym 5 days a week and on a heavily restrictive diet). I had been asking others to befriend their bodies when I myself had not done so myself. Although I am not over-weight or unhealthy, I told myself that I don’t belong because I don’t into fit the stereotypical “yoga teacher” mold, I convinced myself that if only I were smaller I’d have more students come to my classes, that it was normal to skip meals and weigh myself everyday and to punish myself by starving or running on the elliptical if the numbers on the scale didn’t adjust to my liking. Publicly I had been teaching my students about self-acceptance, self-care and self-love while internally I had been waging a long held war. A common theme in my teaching comes from the Bhagavad Gita: “you have a right to perform your prescribed duties, but you are not entitled to the fruits of your actions.” I often paraphrase this idea in my teaching and ask my students to be interested in the actions behind the pose they are doing rather than seduced by the outer shape of the pose. Now, I am trying to take a page our of my own book and am asking myself - can I be more interested in actions of my body, what makes it feel good, how it wants to move, what food fuels it in a pleasing and effective way? I know this is just one step on my road towards less disordered thinking towards my body (I am an imperfect human after all) but just like yoga, it will have to be a practice. So, here’s my pledge to you and more importantly to myself - I am going to practice yoga in the most authentic way I can and work to be more interested in nourishing and befriending my body just as it is and to be less interested in its outer shape. ps. If you are struggling with some of these same thoughts and feelings, this book did a lot to help me as I've been working through these issues: Body of Truth: How Science, History, and Culture Drive Our Obsession with Weight-- and What We Can Do about It As I've written about before, the linking of Plank, Chaturanga, Upward Facing Dog and Downward Facing Dog together is a complex series of poses that Flow practitioners do hundreds if not thousands of times over the lifetime of their practice. The last two blog posts have focused on the specificity of Upward Dog and Chaturanga individually, today I'm writing about the transition between the two, which can be just as culpable for injuries if practiced haphazardly as either pose on it's own. The goal in this transition is to catch the shoulders at elbow height in Chaturanga, keep the shoulders and elbows absolutely stable as the feet move, nothing else until the feet are set for Upward Dog. This allows for the 90 degree angle required of Chaturanga to transition to the 180 degree angle that Upward Facing Dog requires without over stressing the lower back or the rotator cuff muscles. The easiest way to start to learn this transition is to involve our handy-dandy blocks and to utilize the knees during the transition. Have your blocks set up on the highest height, shoulder width distance apart just in front of the hands. Set yourself up in plank, fingertips about an inch away from the blocks and lower yourself down into Chaturanga. Keep your pelvis lifted and tailbone heavy as you tap your knees to the floor, lift the feet, point the toes and then lift back up into Upward Dog by straightening the elbows and lifting knees and thighs off the floor. Remember this transition is about moving the feet and keeping everything else about your Plank/Chaturanga as stable and still as possible until you're ready to move to Upward Facing Dog. Take note of your blocks - did they wiggle or fall over during your transition? Try to keep them as still as possible! Next step would be to continue using the blocks, to be sure the shoulders and elbows are taken care of in Chaturanga, but this time keep the legs lifted and straight. This transition requires a LOT more dexterity in the feet. This dexterity and intelligence starts with the correct foot position in plank. Make sure the ball of the foot is on the floor (you'll know the ball of the foot is on the floor if you are able to lift and spread your toes apart while in plank). If you aren't on the balls of your feet, you won't have enough power in your legs to push your feet back from the curled position into the pointed toe position. When you land in Chaturanga, push backwards through the balls of your feet until you come towards your toes, then flip over onto the tops of your feet, inhale up into Upward Facing Dog. On the exhale lift the hips and drag the feet in towards the hands flipping back over the toes into Downward Facing Dog. Here's an overhead view of the foot transition - note the feet are hip distance apart but the outer ankles stay hugged into the midline throughout (no sickling). A few notes about learning this transition -
Here's the transition in full, no props, just me and my mat.
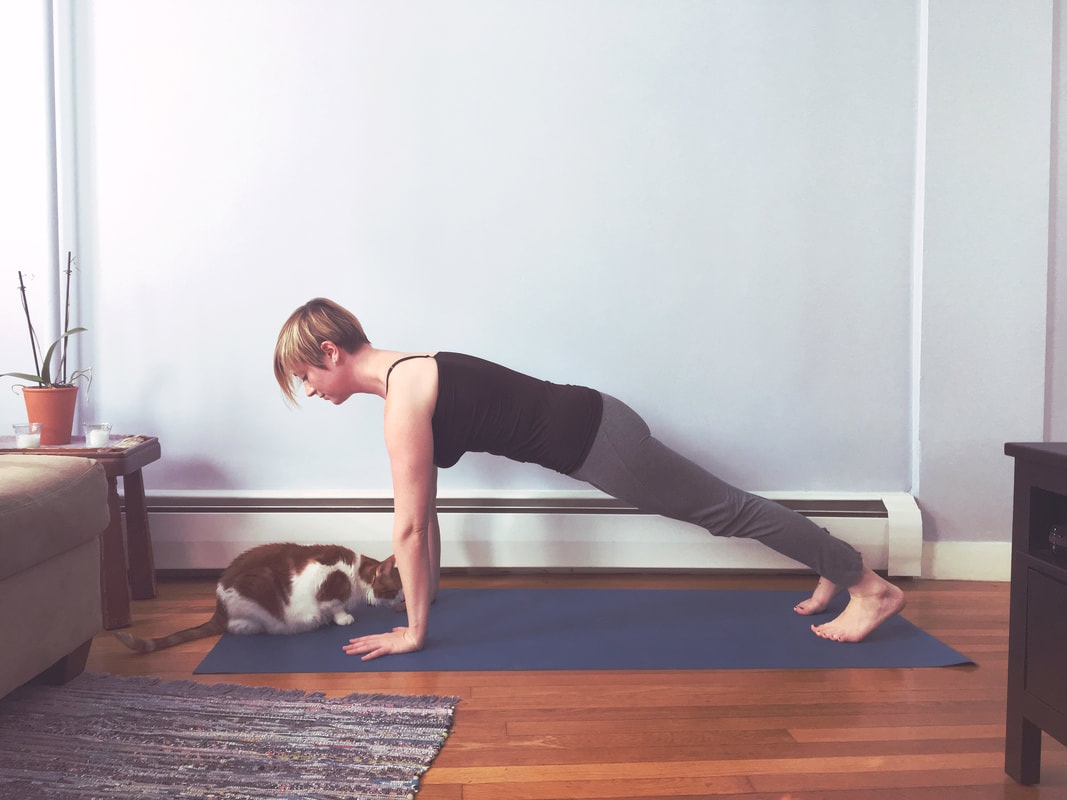
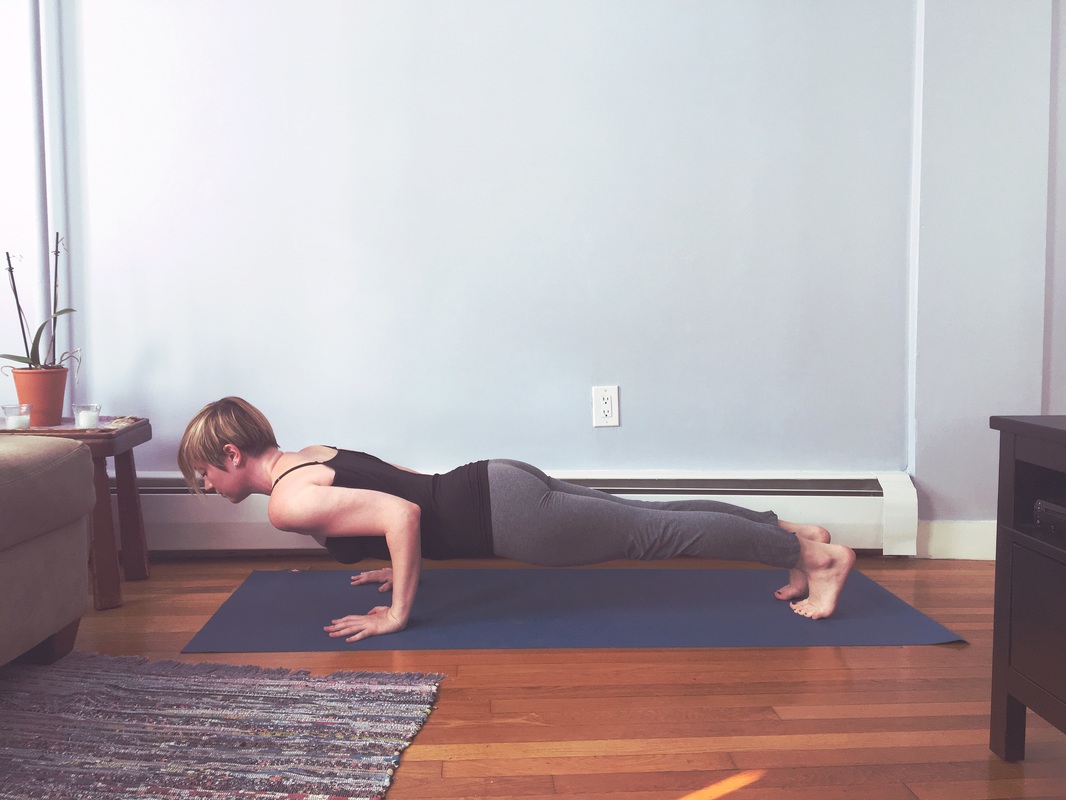
Happy transitioning yogis! -xxx- As many of you already know (I've mentioned it in this blog before) as a teacher I am dedicated to specificity and alignment. Part of what I love about Vinyasa Flow is that when aligned correctly, the flow or linking of poses can move seamlessly from one to the next. Essentially the alignment of one pose can help to inform and create the appropriate alignment for the next pose. As I wrote in my last entry, Sun Salutation A is a mainstay in many a Flow classes. And the Plank, Chaturanga, Up Dog, Down Dog series found within that sequence is one that gets repeated again and again throughout a Flow class - usually called out as a Vinyasa (which isn't completely correct, literally speaking, a "Vinyasa" indicates linking breath with movement, so any two or more poses that are linked with an inhale, exhale etc is a Vinyasa... but I digress) because this sequence is repeated again and again in a Flow class, the alignment of it needs to be impeccable in order to build the appropriate strength and suppleness it offers and to avoid injury. Most injuries in yoga stem from repetitive stress rather than blunt force. So that sloppy Chaturanga done a few dozen times or hundred times can be cause for a sore shoulder or even worse a torn rotator cuff. The beauty of Surya Namaskar A is that if the first pose is well aligned, the rest tend to be better aligned as well. So the alignment of Chaturanga can be derived from the correct alignment of plank. Plank: (cat while helpful, not necessary) Place the hands shoulder width distance apart, fingers spread open with every finger and knuckle joint planted evenly. Align shoulders slightly ahead of the wrist creases (about half an inch). Plant down through the balls of each foot and reach back through the heels strongly (ball of the foot is the protrusion just above the arch of the foot and below the toes). Lift through the hips and thighs as you drop the tail bone heavily between the legs. Chaturanga is plank but with the elbows squeezed into the midline and bent to a 90 degree angle. For many students the strength this pose requires eludes them and things start to go south. Rather than suffering through a haphazard and potentially injurious Chaturanga, here are a few ways to modify this powerhouse of a pose. These modifications will help you build strength in a measured way without inadvertently injuring yourself in the process. 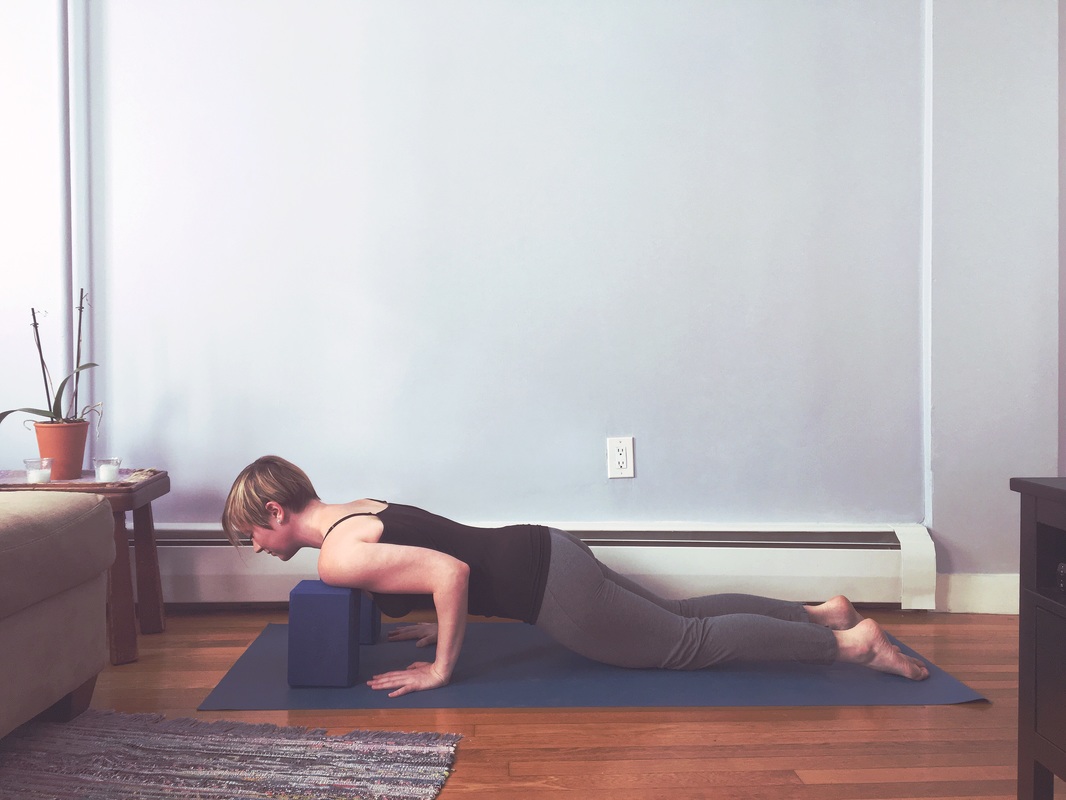 Knees down with blocks: A standard yoga block on the highest height is one of my favorite tactics to teach students about the correct position of the shoulder/upper arm in Chaturanga. While we are not all the same height, most of our forearms are about the same length, so the highest height of the yoga block should catch you right where you are meant to be caught in low push-up... with your elbow at a 90 degree angle, shoulders in line with elbows and elbows over your wrists. Tapping the knees down in this pose lessens the amount of weight you are having to support which allows you to lower down with more control, thus building strength in a safe and appropriate way. Set up in plank with two yoga blocks on the highest height shoulder width distance apart and about an inch in front of your hands. From plank, keep the tail heavy and the shoulders ahead of the wrists slightly then simply tap the knees to the floor (be sure when you do this you don't move the knees closer in towards the hands and continue to keep the shoulders ahead of the wrists, thighs lifted and the tailbone heavy). Keeping the elbows squeezed in towards the midline of the body and the low belly drawing in and up, on an exhale start to bend the elbows until the shoulders lightly tap the blocks. 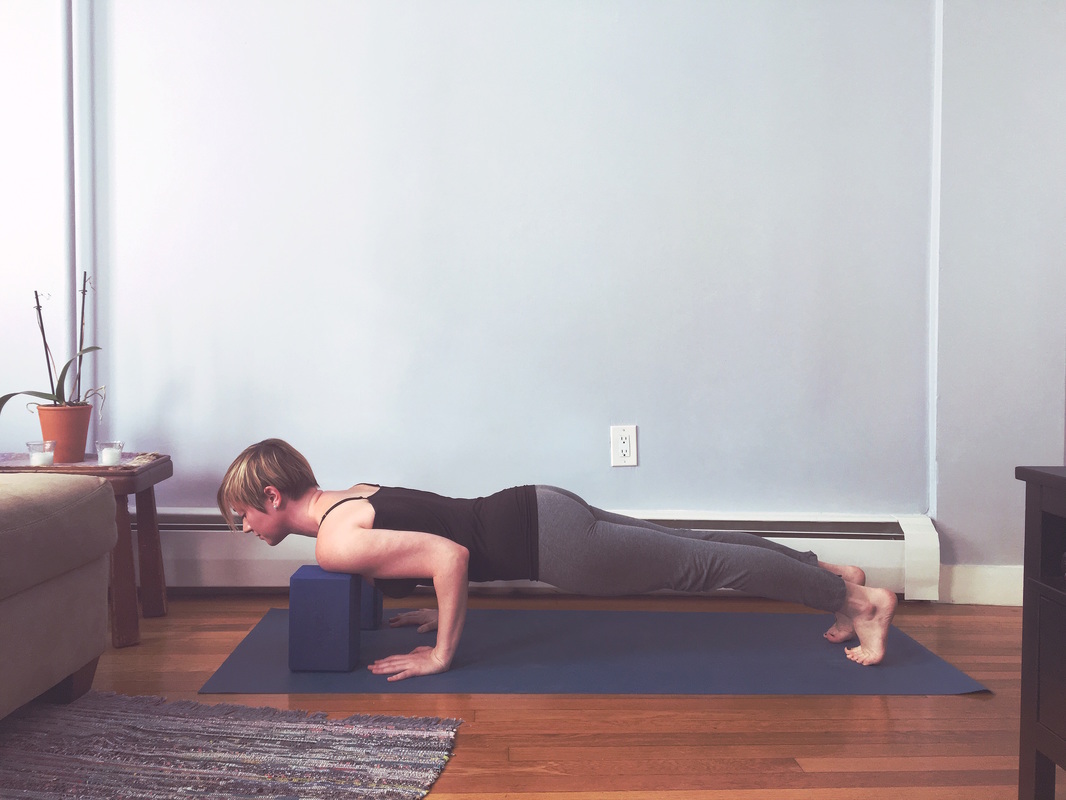 Straight legs with blocks: Set up in plank with two yoga blocks on the highest height shoulder width distance apart and about an inch in front of your hands. Align the shoulders ahead of the wrists about a half an inch and firmly plant the balls of the feet into the floor. Thighs lift so that the hips are about as high as the shoulders but drop the tailbone heavily between the legs so the low belly feels taut. Keep the actions of the thighs, feet and tailbone as you exhale bend the elbows. Squeeze the elbows in towards the midline of the body, so the upper arms graze your sides. Have the blocks catch you at elbow height. All of the actions in the thighs, feet and tailbone should be the same as when you were in plank. PS. If your pelvis hits the floor by the time your shoulders hit the blocks, you probably need to walk your feet a little closer to your hands and really commit to the thigh lifting, heel reaching back actions as you are lowering. If your shoulders hit the blocks but your butt got left up where it started in plank, usually you need to drop the tailbone more and think of lowering your body as one straight line rather than "diving" forward with just the shoulders and chest. Once you've gotten the hang of practicing with blocks you can try moving them off to the sides of your mat so you can still see them as you're lowering but they won't be there to actually catch you, allowing you to hone your proprioception so you can begin to consistently catch yourself in Chaturanga. Happy Chaturanga-ing!!! xxx
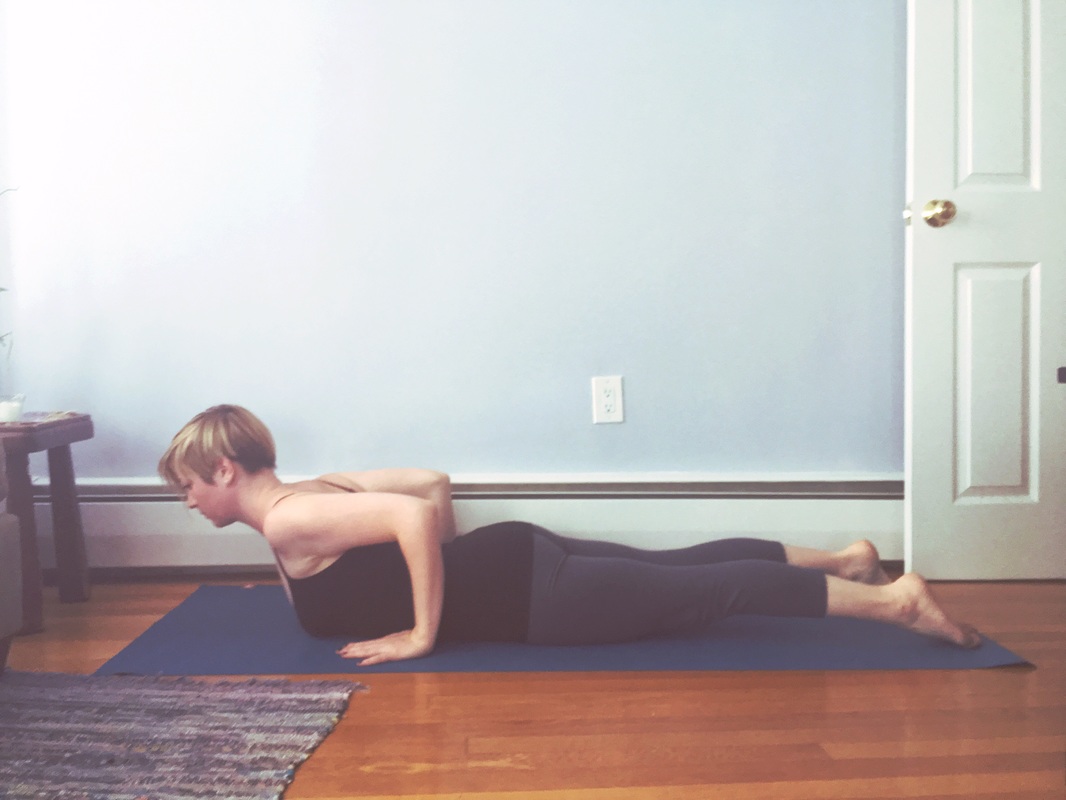
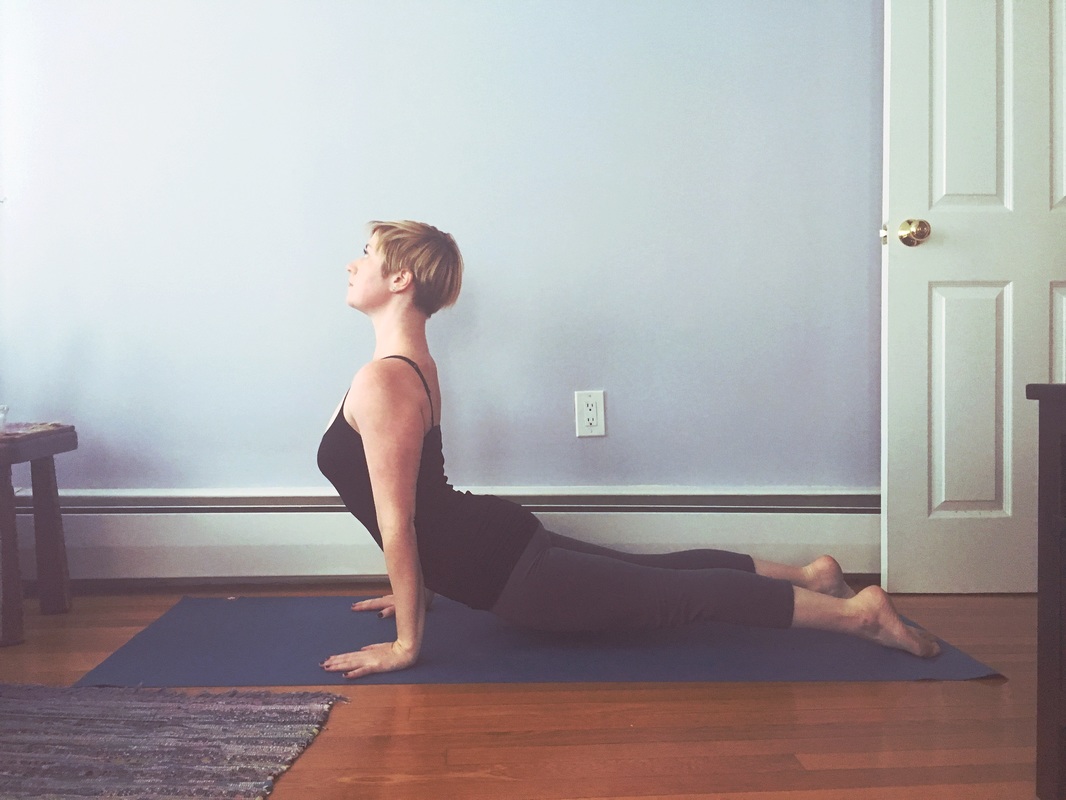
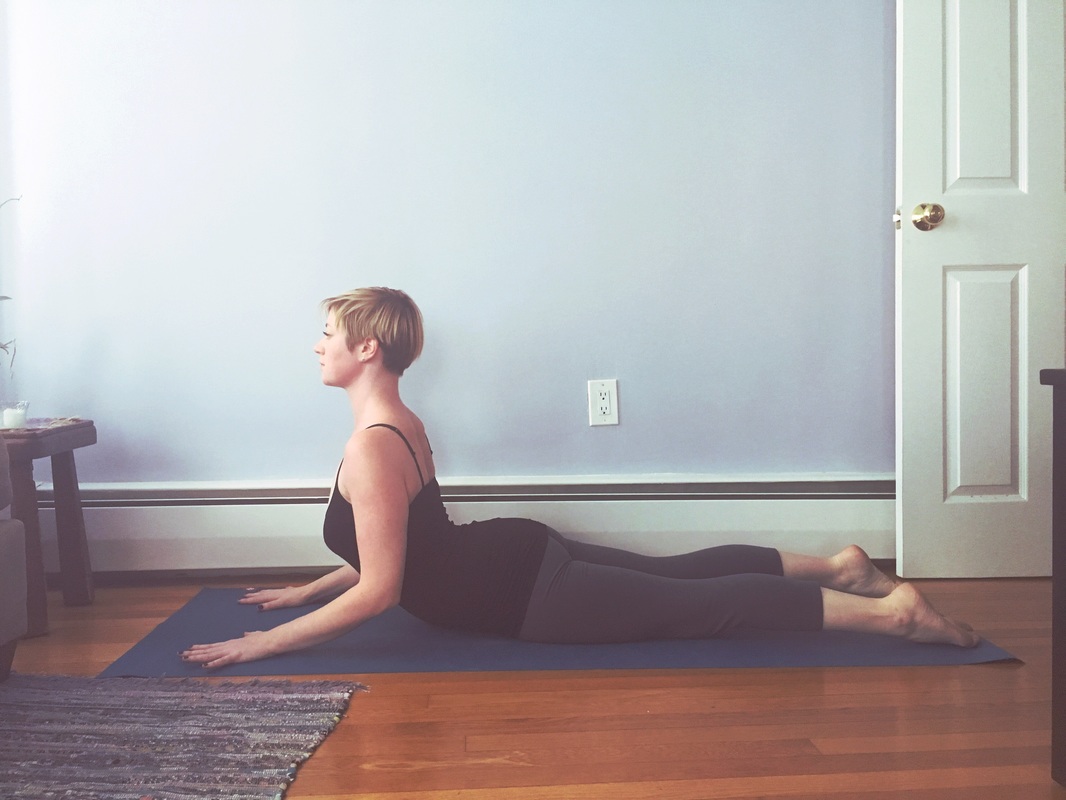
Scrolling through Facebook I can’t help but notice when I see a stock yoga photo of students doing some ambiguous pose attached to some well-meaning article titled something like “Yoga Poses for Better Sex” or Sleep or Weight Loss or pick your favorite “it” topic. I squint down and think to myself “what on earth are they doing?” I study the pose and as far as I can tell, it seems to be an unhappy marriage between Upward Facing Dog and Cobra Pose. The hips rooted to the floor, shoulders are crunched up by the ears, elbows locked straight, hands planted several inches in front of the shoulders and neck is cranked back as far as physically possible. I briefly cringe and wonder - “does that even feel good?” Usually, that’s where it ends, I scroll on and actively try to not think about the potential cricked neck or torqued lower back that might result from such a pose. I actively try to forget it until the next class when I teach Upward Facing Dog and someone across the room is doing an exact replica of the pose I was cringing at in that stock photo. Cue me tearing across the room to triage the situation. If there is one thing that I believe in as a teacher of yoga asana, it’s finding strength and mobility within poses that is born out of the specificity of proper alignment. Under normal circumstances, a healthy spine should be able to move in any direction at will. More often than not, the one direction of movement that has the most fear and misunderstanding associated with it are backbends. Backbends are an integral part of any asana practice, and are especially prevalent in a Vinyasa Flow practice. Upward Facing Dog is a core pose in Surya Namaskar A (Sun Salutation A) and portions of Surya Namaskar A, including Upward Facing Dog, are used as a palate cleanser of sorts between standing poses during many a Flow class, which means as a student you will have a plethora of chances to give your Up Dog a go. I am a teacher who believes in specificity, which to me means that I am a teacher of individuals, not just of poses. Therefore, it is understandable, even EXPECTED that not every student in the class will practice Upward Facing Dog pose every time it's offered, there might even be some students who will never in their lifetime practice Upward Facing Dog, despite it's tenure within the Vinyasa catalogue. This choice, to me, is a sign of a sophisticated practitioner. It is not about what backbend you choose to practice in your Vinyasa, but instead practicing with specificity whatever one you do choose. One of my favorite quotes about what yoga, something that keeps me excited about teaching alignment and actions to the students who walk through my classroom door, comes from the Bhagavad Gita: "yoga is skillfulness in action." Skillfulness in action isn't blowing through your practice trying to get from Pose A to Pose B as quickly as possible. Skillfulness in action isn't about showing off how high you can lift your leg or doing the backbend the neighbor on your right just did because anything they can do you can do better. Skillfulness in action is introverted, it is inquisitive, it is asking your body, "what makes sense today?" and waiting for the answer and moving in a way that is mindful and aligned. Which brings me to why I am even writing this post, a big part of that skillfulness is knowing what options you have available to you. If the only backbend you've ever seen is Up Dog but you aren't able to yet do it in an aligned way, that can be frustrating and isolating. Below are some backbends that can be easily folded into your Vinyasa Flow practice along with their alignment and essential actions. As Sir Francis Bacon famously coined: knowledge is power. This knowledge can make the difference between a frustrating, pain, and fear-filled practice and one that is aligned and satiating. Do what makes sense, and leave what doesn't. Low Cobra - this pose is a great way to start to practice all of the actions needed in either Up Dog or Cobra but under less dire circumstances. Start laying on your belly, big toes pointing straight back. Place your hands beneath your elbows and squeeze your elbows in towards the midline of your body and on an inhale roll the shoulders away from the floor, aiming for your arms to land in about a 90 degree angle. Press down through every toenail, including your pinkie toes, engaging the fronts of your thighs until your knees start to get light off the floor. Spin your inner thighs to the ceiling as you firm your outer ankles in, keeping your big toes parallel pointing straight back towards the wall behind you. With every exhale try to root down through the tops of your feet, with every inhale roll the shoulders back and away from the floor as you squeeze the elbows towards each other. PS. you can intensify this pose by lifting and hovering your hands just above the floor, it's an awesome way to build up back strength without putting a lot of strain on your low back. Still work to keep the hands under your elbows and fight to keep your elbows pinned in towards the midline. Upward Facing Dog - Start laying on your belly, big toes pointing straight back. Place your hands beneath your elbows and squeeze your elbows in towards the midline of your body. Root down into the tops of your feet vigorously until the fronts of your thighs engage and knees lift up off the floor. Focus on spinning the inner thighs to the ceiling, and as you do firm your outer ankles in to keep your big toes parallel and are pointing straight back. From here press the hands and feet into the floor equally and straighten the elbows. Stack your shoulders directly over the wrists, lift your thighs and knees off the floor as you allow for the hips to hammock forward and down. Push your shoulder blades towards your collar bones so you are pulling your chest forward and up through your upper arms. Roll the heads of your upper arms away from the front of the room as you continually push the floor away with both the hands and the feet. PS. If your Low Cobra is well-aligned, Up Dog is built to be a direct relation to Low Cobra - all you need to do from Low Cobra is straighten the arms and lift the thighs while the hips hammock forward and down. Cobra - Start laying on your belly, big toes pointing straight back. Place your hands beneath your shoulders and squeeze your elbows in towards the midline of your body. Root down the tops of the feet and start to push the hands into the floor peeling the front of the torso away from the floor. Keep the elbows into the midline and roll the heads of the upper arms back and down away from the ears. Hips and thighs maintain on the floor.
PS. Cobra tends to be a stand alone backbend as opposed to one you "flow" through like Low Cobra or Up Dog. Mainly because it requires a different hand/shoulder alignment than the other backbends so it doesn't really lend itself to following Chaturanga. xxx |
Kate HeffernanYoga Teacher based in Boston, MA. Teacher of Yoga Teachers. Committed to teaching anatomical, alignment & action based yoga asana that is rooted in mindfulness, skillfulness, & specificity. Archives
March 2020
Categories
All
|

 RSS Feed
